I love adding color to our Christmas and I love oversized ornaments that make a statement on a Christmas tree. These DIY yarn ball ornaments deliver both!

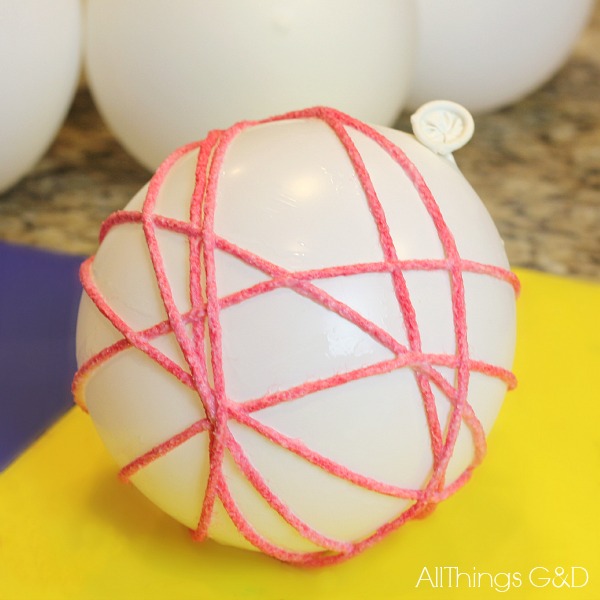
To make, I gathered up my strands of yarn, some balloons, and a variety of glue sources we had around the house. I used 12″ balloons for this project, blown up about halfway – just to the point where they got round in shape.

Pour glue into a container and thin slightly with water. Dip one long strands of yarn at a time into the the glue and stir it around to get it completely coated.

Pull the strand out of the glue starting at one end, and lightly squeezing the strand between your fingers as you pull it out of the glue. You want to remove excess glue with your squeeze, but you still want your yarn strand to be wet and gluey. Begin wrapping yarn around your balloon, continuing to wet additional strands with glue until your balloon is covered as much as you’d like. Tuck final strand beneath other strands so it does not pull apart off of the balloon.
UPDATE: Make sure you DO NOT pat around your glue-soaked yarn as you go (or when you are done). Some readers are experiencing excess glue or film in the spaces between their yarn after they pop their balloons, and this happens when the glue spreads from the yarn out across the balloon during this step. So as you wrap, be sure to wrap your glue soaked yarn around your balloon and leave it at that. DO NOT got back over it all and try to pat it or smoosh it closer to your balloon – anything that would spread your glue out across your balloon.
I tied a strand of yarn around the end of the balloon and hung it from my upper kitchen cabinets to dry. Be sure to place a piece of wax paper or parchment paper underneath the balloons to catch any glue that might drip from the bottom of them as they dry.
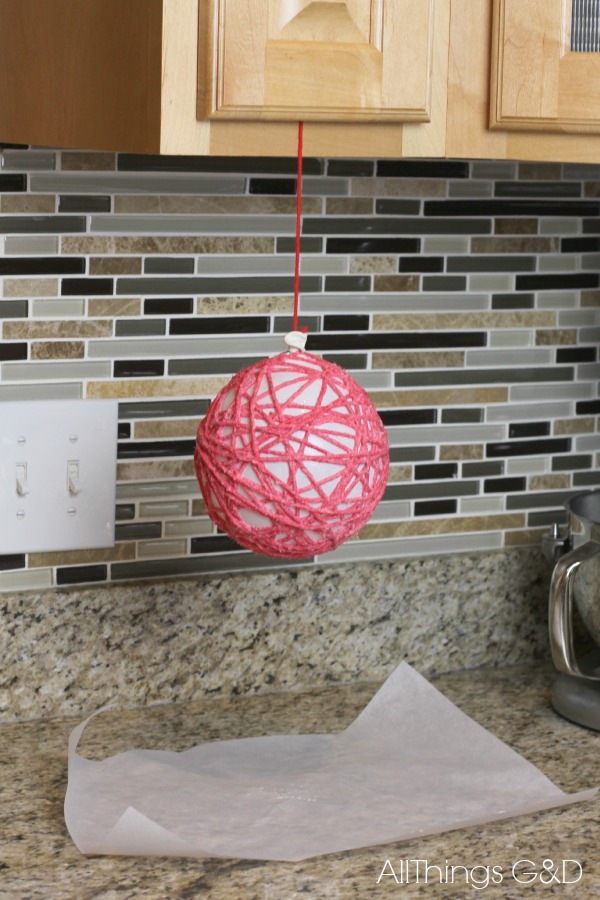
Let yarn balls dry at least 24 hours (more if needed) and then pop the balloon inside and pull it out of the yarn circle frame. String a new strand of yarn through the top, and that’s all there is to it!

I tried a variety of glues (my affiliate links below) I had on hand to see how each one would turn out and here were my results:

The glue test – a side-by-side comparison.
- I did the red yarn ball in good old elementary school Elmer’s Glue
thinned with water. Of all of the yarn balls this one is the only one that’s a little soft and squishy, although it does still hold it’s circle shape just fine. This glue dried really well and was the only one of all of the glues that dried with a matte finish which I like (the rest have a glossy sheen). If I did this again with Elmer’s glue I’d try it straight up, without thinning it with any water.
- I did the blue yarn ball with Mod Podge
thinned with water, the pink ball thinned with Mod Podge thinned with just a teeny bit of water, and the green ball with straight up Mod Podge (no thinning) and I’m pretty sure all three of these suckers would break a window if I threw them at one. They’re rock solid and there’s no loosing that circle shape, which I like. There’s pretty much no difference in hardness among the three so if you go with Mod Podge feel free to thin it with water to stretch your dollar a little further.
- I did the orange yarn ball with Aleene’s Tacky Glue
and have to say I never realized how thick this stuff is until I used it side-by-side with other glues! It’s super thick so I thinned it quite a bit with water, and it turned out great. It dried very firm and the sheen wasn’t quite as glossy as the Mod Podge.
Bottom line?
Go ahead and use whatever you have on hand and it’ll work great. If you’re going to buy something, Aleene’s Tacky Glue is the best bang for your buck since it works great watered down so you need less glue.
With all these DIY ornaments laying around our house lately Kate couldn’t wait to put them to use, so we pulled out her Christmas tree over the weekend and she spent hours meticulously decorating it. She pretty much has one rule when it comes to her tree – anything goes as long as it’s not plain gold (gold glitter appears to be allowed). She quickly claimed these colorful, oversized yarn ball ornaments for her tree and I absolutely love how they pop. We’ll definitely be making more!

Kate’s 2014 Christmas tree.

Oooo I love this one! Being a knitter I have tons of random yarn scraps around not enough for a knitting project. Think I will be making a bunch of these I also was wondering if you could make smaller ones and string them through a strand of lights like I’ve seen with those grapevine wreath balls. Just another idea 😉
Great idea, Ginny!! You could definitely make smaller ones – just be sure to buy smaller balloons. This is about the smallest I could go (and still get that circle shape) with 12″ balloons.
LOVE these! The bright colors are fantastic and it’s so fun to see that your daughter loves to decorate with them. She must get it from you :).
She is 100% to blame for bringing color to our Christmases! I love it.
Thank you, Chaney!
I think this may be my favorite! LOVE!!! The colors are so fun and the tutorial is spot on!!! I’m gonna make a bunch of these and put them all over my house! Like an Easter egg hunt, only with really cool yarn balls!!!
Thank you so much, Linda! They’re super fun to make and I’m sure they’ll look great around your house!
These are so cute! I would love if you would share this at my blog party, Celebrate It! It’s all about celebrating our wonderful, everyday lives! http://thefreshmancook.blogspot.com/2014/11/celebrate-it-blog-party-18.html
Reply
Thanks for the invite, Teri!
I am not crafty at all (my 13 year old daughter is – still cannot figure that one out) but I think this may be a craft that we could do together! Thanks so much for posting this! I think we will make some red and white ones for the chandelier in the dining room.
Love that idea, taddsmama! I hope you girls have fun making these!
I tried these over Christmas and they are certainly cute. BUT, when they were dry and I popped the balloons the holes left in the ornament, were partly filled with a film from the glue and I could not clear that out. Didn’t look good at all. I tried the Mod Podge and the Elmers glue. They both did it. And I did squeeze the yarn some when I glued them to the balloons. Did you have that problem>
I have the shiny film too – I am using a pin – stuck it in the holes and moved it around – still workin on it – but it is better. I am going to try using liquid starch once I buy some.
PS – I am making egg shapes for spirng
– from less full blown balloons
Love that idea!
What did you all do about the glue left in the holes? I really want to make these with my grandchildren so they can put them on their trees and give some to their teachers at school, but need to know how to fix the problem first. I would so very much appreciate it. Merry Christmas to you all and thank you so much!
Hi Ginger! The fix for this is to make sure you DO NOT pat around your glue-soaked yarn as you go (or when you are done). That additional film happens when the glue spreads from the yarn out across the balloon. So as you wrap, be sure to wrap your glue soaked yarn around your balloon and leave it at that. DO NOT got back over it all and try to pat it or smoosh it closer to your balloon – anything that would spread your glue out. I hope that helps, and Merry Christmas to you!
Great tip, Dianne – thank you! To prevent that from happening next time make sure you DO NOT pat around your glue-soaked yarn as you go (or when you are done). That additional film happens when the glue spreads from the yarn out across the balloon. So as you wrap, be sure to wrap your glue soaked yarn around your balloon and leave it at that. DO NOT got back over it all and try to pat it or smoosh it closer to your balloon – anything that would spread your glue out. Hope that helps!
Sorry I didn’t see your comment sooner, Judy! The fix for this is to make sure you DO NOT pat around your glue-soaked yarn as you go (or when you are done). That additional film happens when the glue spreads from the yarn out across the balloon. So as you wrap, be sure to wrap your glue soaked yarn around your balloon and leave it at that. DO NOT got back over it all and try to pat it or smoosh it closer to your balloon – anything that would spread your glue out. Hope that helps!
Hi.luv the idea but when I tried making one of these my balloon was stuck to the string n it mushes the string when I tried to take it out:(.what should I do
Hi Naz, try gently pushing the balloon away from the string (while still holding the string in place) before you pop the balloon. This should help you get it unstuck before you pop it so the balloon doesn’t take the string with it when you do. Hope that helps!
I wish you had put this in the instructions at the beginning. I thought there was something wrong with what I was doing. Both times I tried this, the popped balloon collapsed the yarn ball. Very disappointing. I’ll try one more time with this bit of information. Hopefully it will work.
OK! Here is an update. I didn’t want to give up on my third try on this. So, I blew up a balloon inside the deflated yarn sculpture, and then I painted more glue on the heavy “crossroads” of the yarn design. Maybe even most of the whole thing. Waited for several days. I pushed the balloon away from the yarn, and BRAVO! It held beautifully! So, it’s not a lost cause.
Final update: it held beautifully for a couple days, then it was deflategate. I don’t understand how yours came out so picture perfect. Be honest: did they stay that way? Or did you have to keep manipulating them to keep their globe shape?
Oh my goodness, totally honest – mine held up great! I would truly say if they didn’t. I think (at least for me anyway) the more glue and/or the thicker/stickier glue I used the harder they set. Maybe it had something to do with the yarn you used? I really don’t know! I’m sorry to hear you didn’t get the results you were hoping for, Theresa!
Thanks for the wonderful tutorial! May I ask what type of yarn you used?
Truthfully, I’m not familiar with yarn types, so I will say I used “regular” yarn, and also (for the orange for sure) a yarn that was a little denser, with less fluffiness coming off the string. The less “fluffy” the yarn, the straighter/cleaner your yarn ball lines will be. For the “fluffier” yarns, I tried to smooth out the strings after I applied the glue to the balloon so the resulting yarn ball “cages” would have cleaner lines. Hard to explain but I hope that helps!
I read another bloggers ideas and she suggested wrapping the balloon with Saran wrap to keep the twine from sticking…. haven’t tried it …any thoughts?
It is 2018 and I am just now considering making twine balls. I wondered what the difference was between the products and your’s is the first comparison that I have been able to find. Thank you!
Hi Amber – twine “yarn” ball ornamnets should work out well (love that idea, by the way!). I would just suggest to make sure you use enough glue to saturate the twine to get it to hold. Maybe try one tester first. Good luck!