• About
    • Meet Dusty
    • Policies & Disclosures
  • Blog
  • ATG&D Dream Home
  • Galleries
    • Home & Decor
    • DIY
    • Entertaining
    • Food
  • Social Media
  • 
  • 
  • 
  • 
  • 
  • 
  • 
  • 

DIY Pom Pom Garland

December 16, 2014 By Dusty Rogers Leave a Comment

Create a festive garland for your holiday decor, birthday party or baby shower with this DIY Pom Pom Garland tutorial, complete with step by step pictures. | www.allthingsgd.com

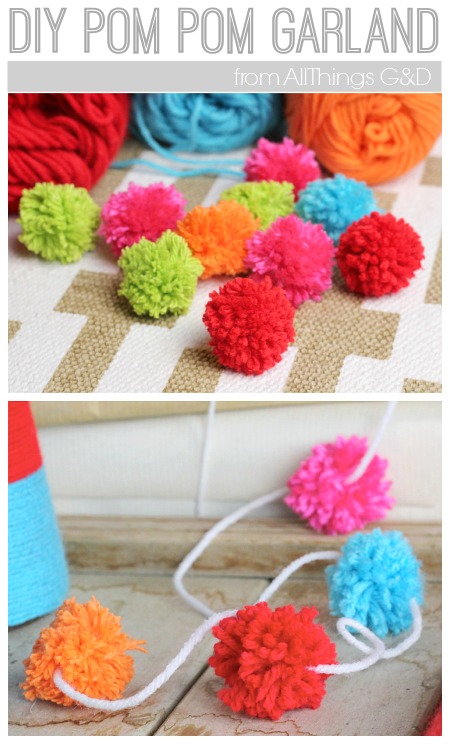
I’ve been having so much fun decorating with my DIY pom pom garland that I have to share the how-to so you can enjoy it, too!

I’ve used it in our window decorations:

Create a festive garland for your holiday decor, birthday party or baby shower with this DIY Pom Pom Garland tutorial, complete with step by step pictures. | www.allthingsgd.com

Create a festive garland for your holiday decor, birthday party or baby shower with this DIY Pom Pom Garland tutorial, complete with step by step pictures. | www.allthingsgd.com

On our Christmas tree:

Create a festive garland for your holiday decor, birthday party or baby shower with this DIY Pom Pom Garland tutorial, complete with step by step pictures. | www.allthingsgd.com

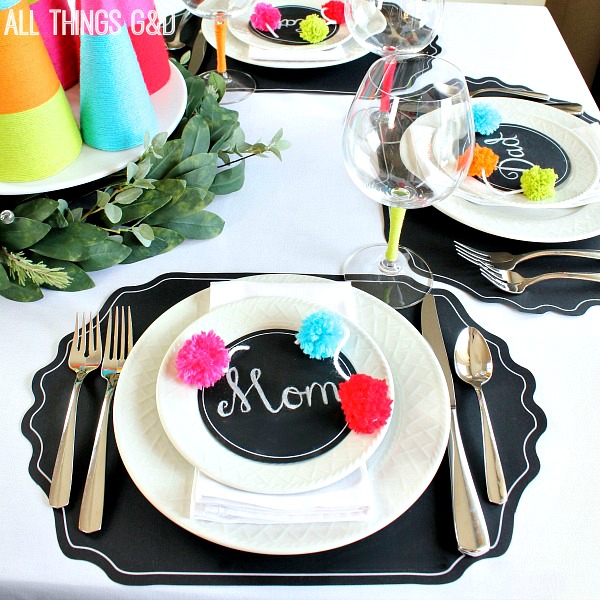
And even on my colorful Christmas tablescape:

Create a festive garland for your holiday decor, birthday party or baby shower with this DIY Pom Pom Garland tutorial, complete with step by step pictures. | www.allthingsgd.com

Making this super fun DIY pom pom garland is time-consuming, I’ll admit, but very easy to do.  All you need is yarn, a fork, scissors and a large needle.

Supplies
Yarn
Fork
Scissors
Needle

Create a festive garland for your holiday decor, birthday party or baby shower with this DIY Pom Pom Garland tutorial, complete with step by step pictures. | www.allthingsgd.com

Directions

1.  Start by cutting a 6 inch piece of yarn and sliding it through the middle prongs of the fork.

2.  Pull it straight down toward the fork handle and hold it between your fingertips to keep it secure and prevent it from getting tangled with the yarn you’ll be wrapping above it.

3.  With your other hand, grab an end of yarn from the skein and begin wrapping it around the fork, perpendicular to the first strand your other hand is holding.

4.  Wrap the yarn around the fork 35-45 times.  The number of times you wrap the yarn around the fork determines how thick and full your pom pom will be.  I found that 35 times works great for standard yarn like the red yarn in the pictures below, however for some of the softer, speciality yarn I used (like the pink yarn pictured above) I needed to wrap it about 45 times to get the fullness I wanted because that yarn strand was thinner.  Start with one pom with each color of your yarn to determine how many times you’ll need to wrap it for that color/yarn to get the fullness you’d like before you continue to make more pom poms out of that color.

Create a festive garland for your holiday decor, birthday party or baby shower with this DIY Pom Pom Garland tutorial, complete with step by step pictures. | www.allthingsgd.com

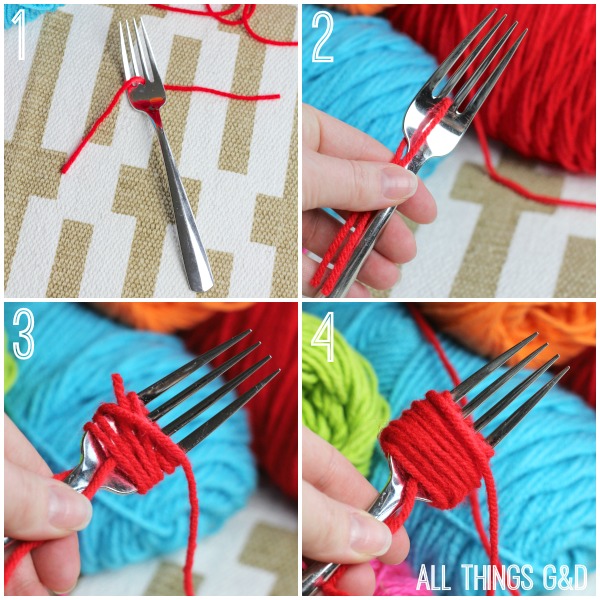
5. Once you’re done wrapping, bring that first 6″ strand of yarn up, center it around the middle of the bundle of yarn on your fork in both the front and the back.

6.  Tie once to secure it in place.

7.  With the first tie in place, slide all of your yarn off the fork entirely, and tighten your first tie as tightly as you can.

8.  Tie a second tie to knot it and secure your bundle of yarn together through the middle.

Create a festive garland for your holiday decor, birthday party or baby shower with this DIY Pom Pom Garland tutorial, complete with step by step pictures. | www.allthingsgd.com

9.  Take a sharp pair of scissors with a pointy tip and cut the loops around the sides of your bundle of yarn.

10.  Continue cutting all the way around until all of the loops are snipped, and then roll the yarn ball between your palms to get it to splay out and give it the shape of a ball.

11.  You’ll have some ends of yarn that stick out more than others, likely giving your pom pom more of an oval shape than a circle shape, so once you’ve roughed it up between your hands give it a haircut, trimming ends as needed, to give your pom pom the shape of a circle.

12.  Last, thread a strand of yarn through a large needle and poke it through the center of your pom pom, and continue threading pom pons onto your yarn until your pom pom garland is its desired length.  There is no need to knot your yarn in between the pom poms; the pom poms will stay put and you can slide them around on your yarn as needed for proper placement.

Create a festive garland for your holiday decor, birthday party or baby shower with this DIY Pom Pom Garland tutorial, complete with step by step pictures. | www.allthingsgd.com

And that’s all there is to it!  I used this DIY pom pom garland for our holiday decorations but they also make great decorations for a birthday party or baby shower, so be sure to pin this project to Pinterest and come back to it when you need it!

Create a festive garland for your holiday decor, birthday party or baby shower with this DIY Pom Pom Garland tutorial, complete with step by step pictures. | www.allthingsgd.com

Like this project? Check out the All Things G&D Entertaining Gallery for more!

Share this:

  • Pinterest
  • Facebook
  • Twitter
  • Google
  • Email
  • More
  • Tumblr
  • LinkedIn
  • Print
  • Reddit


Leave a Reply Cancel reply

Your email address will not be published. Required fields are marked *


Details Boutique - women's fashion boutique. Statement style for grown-ass women. www.detailsgetnoticed.com

Looking for something?

  • 
  • 
  • 
  • 
  • 
  • 
  • 
  • 
  • 

Subscribe

Categories

Archives

Most Popular Posts

  • 10 Tips for Perfect Cake Pops
  • 20 Candy-Free Easter Egg Fillers for Toddlers
  • FREE Cars Birthday Party Printables
  • The Making of Kate's Cars Birthday Party
  • Yarn Ball Ornaments
  • FREE Sesame Street Birthday Party Printables
  • How to Add a Shelf to an IKEA Expedit
  • DIY Felt Poppies {Memorial Day Poppies}

Hi! I’m Dusty Rogers - blogger,
mother, maker, decorator, and drinker
of the wine here at All Things G&D.
Thank you so much for joining me!

  • facebook
  • instagram
  • pinterest
  • twitter

Join The VIP List

Copyright © 2023 All Things G&D Log in

loading Cancel
Post was not sent - check your email addresses!
Email check failed, please try again
Sorry, your blog cannot share posts by email.