I don’t know who decided spiders should be a decorative part of Halloween, but I’d like to have a word with them.
I have a horrible, crippling, terrifying fear of spiders. So far in life I’ve ran my car off the road, held up traffic at a busy intersection, and persuaded a delivery man to come inside and kill a spider when I was home alone. These are just a few of many moments that I’ve gone from a strong, independent, DIY kind of woman to a freaked out horror show – all because of those 8-legged torture devices.
Embarrassingly enough, even the fake ones scare me.
The good news is, fake spiderwebs do not. So when I got this idea to make a DIY Spiderweb Halloween Table Runner I was calm, cool, and collected.
And when it came time to add the fake glittery spiders onto it for pictures I used tongs.

To make, I used the same flour sack kitchen towels that I used to make my DIY Mummy Pumpkin, and a black Sharpie marker – that’s it!
Supplies
Flour Sack Kitchen Towel
Black Sharpie Marker
Directions
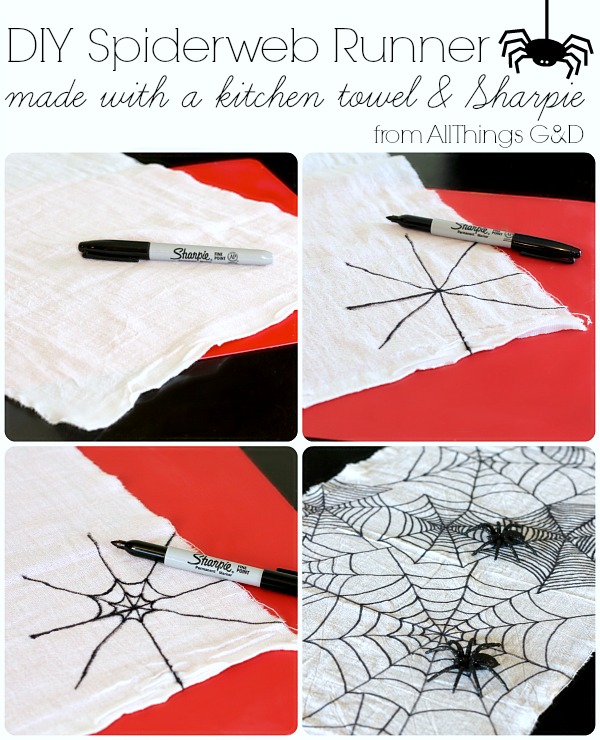
- Fold flour sack towel in half and make a small cut with scissors at one end of the halfway fold. Rip the towel in half the rest of the way to get a raw-edged look. Clip other edge of the towel and rip for a raw-edge on the other side of your table runner.
- Lightly iron towel to get out the fold lines. I liked the subtle crinkling throughout the towel for my table runner, so I purposely did not iron it completely smooth.
- Using a black Sharpie marker (and a mat underneath so the marker doesn’t bleed through onto your table), draw straight lines coming out from a center point at seen in the photo above.
- Connect your lines with inverted arches as seen in the photo above.
- Continue repeating, playing around with line and arch sizes and spacing until your runner is completely covered in spiderwebs.
The tutorial photo above shows a fine point Sharpie marker, but I actually found a medium point Sharpie works best (and is what I used for the photos of the finished product).
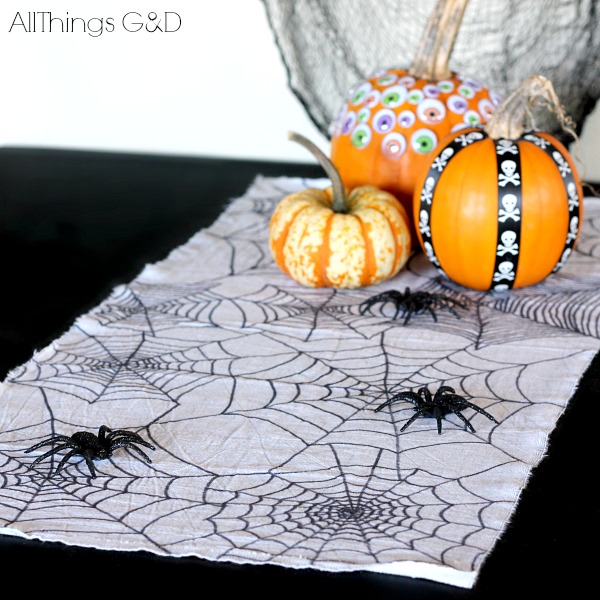
DIY Spiderweb Halloween Table Runner
If killing spiders were as easy as making this table runner I’d never need a delivery man again.
Like this project? Check out my DIY Gallery for even more!
This post was linked up and featured on That’s What Che Said’s Monday Funday Link Party for Last Minute Halloween Ideas:

So cute and so easy! I love it!
Thank you so much!
What a clever idea! Love the idea of using a sharpie.. so much easier than any paint brush!
Thank you, Donna!
Dusty, I featured your project on Monday Funday! Thanks for linking up with us! xo – Cheryl @ That’s What Che Said…
http://www.thatswhatchesaid.net/2014/11-last-minute-halloween-ideas-monday-funday-link-party/
Oh how fun! Thank you so much, Cheryl!