• About
    • Meet Dusty
    • Policies & Disclosures
  • Blog
  • ATG&D Dream Home
  • Galleries
    • Home & Decor
    • DIY
    • Entertaining
    • Food
  • Social Media
  • 
  • 
  • 
  • 
  • 
  • 
  • 
  • 

DIY Painted Twig Vase

September 9, 2014 By Dusty Rogers 14 Comments

DIY Painted Twig Vase tutorial. Celebrate fall by bringing a little nature indoors! | www.allthingsgd.com  #fall #fallcrafts #falldecor #repurpose #diy

It’s September! For a girl who’s allergic to chlorine, gets sick from open sun, and is enemy #1 to mosquitoes, you better believe I’m tickled all shades of autumn to welcome September’s transition into fall! The tree in our front yard is already turning and dropping leaves, and I couldn’t resist snipping some branches to make this DIY Painted Twig Vase. Nothing says fall like brining a little bit of the rustic outdoors inside!

DIY Painted Twig Vase tutorial. Celebrate fall by bringing a little nature indoors! | www.allthingsgd.com  #fall #fallcrafts #falldecor #repurpose #diy

DIY Painted Twig Vase

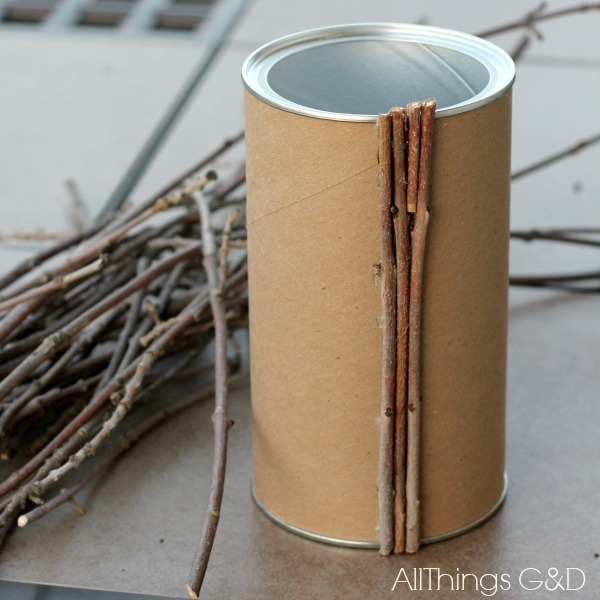
To get started, find your nearest tree and trim some branches.  Straight ones are the easiest to work with, but I’ll admit I loved working with the curved ones and piecing it all together to fully cover my container.  I used an empty canister as my vase, but you can use anything you’d like!  A large tomato sauce or peaches can, or anything in the height and width that you’d like.

DIY Painted Twig Vase tutorial. Celebrate fall by bringing a little nature indoors! | www.allthingsgd.com  #fall #fallcrafts #falldecor #repurpose #diy

Wrap your canister with the unprinted side of a brown paper bag.  This ensures that you won’t see any of the label through any of the gaps in the sticks.

DIY Painted Twig Vase tutorial. Celebrate fall by bringing a little nature indoors! | www.allthingsgd.com  #fall #fallcrafts #falldecor #repurpose #diy

Cut or snap your twigs to the appropriate height and use a hot glue gun to glue to glue them to the canister.  You may need to work with the sticks and piece things together to get it all to fit and be covered, but that’s all part of the fun!

DIY Painted Twig Vase tutorial. Celebrate fall by bringing a little nature indoors! | www.allthingsgd.com  #fall #fallcrafts #falldecor #repurpose #diy

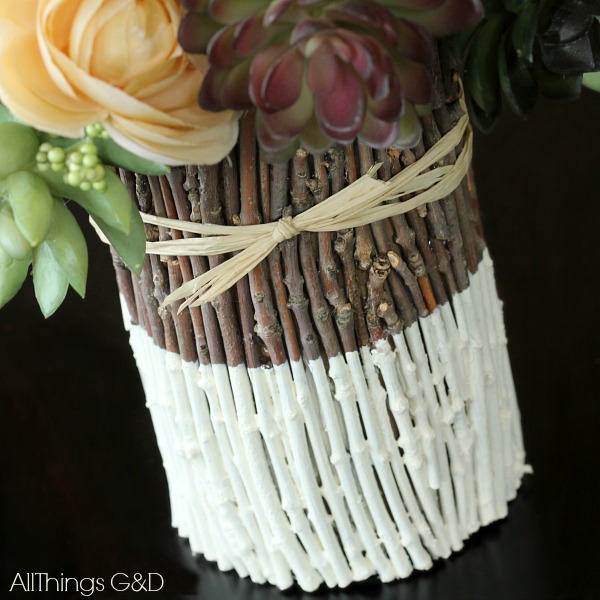
Here’s how mine looked fully covered in twigs.  You could stop at this step and have a fabulous rustic vase, but I preferred to take things one step further.

DIY Painted Twig Vase tutorial. Celebrate fall by bringing a little nature indoors! | www.allthingsgd.com  #fall #fallcrafts #falldecor #repurpose #diy

As my Instagram peeps already know, I got a killer blister from this glue gun doing this project. Totally worth it.

I was worried that a painter’s tape line across the twigs would rip off some of the bark, so I folded a piece of paper, secured it with rubber bands, and used that as my painting line.  I chose a vanilla colored craft paint, which costs about $1.50 at the craft store.

DIY Painted Twig Vase tutorial. Celebrate fall by bringing a little nature indoors! | www.allthingsgd.com  #fall #fallcrafts #falldecor #repurpose #diy

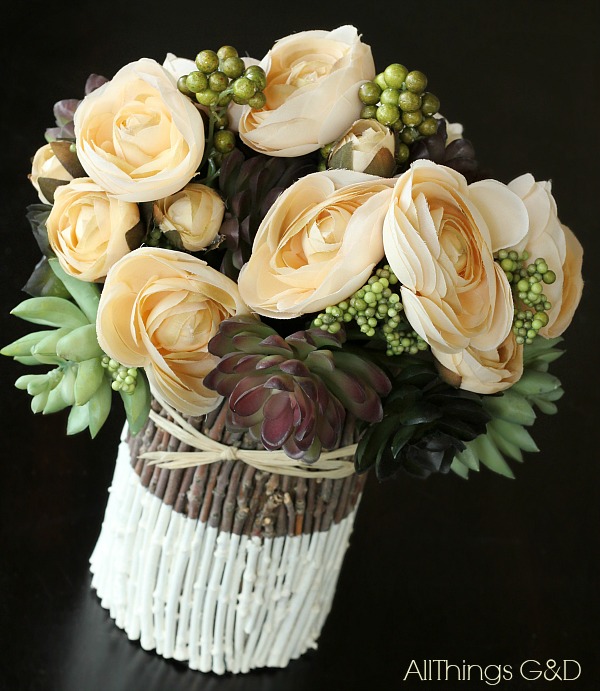
Let that dry, tie with a strand of raffia, fill with flowers, and enjoy!

DIY Painted Twig Vase tutorial. Celebrate fall by bringing a little nature indoors! | www.allthingsgd.com  #fall #fallcrafts #falldecor #repurpose #diy

I typically prefer fresh flowers, but this faux rose and succulent arrangement that I found at Michael’s was too gorgeous to pass up.  This foliage-filled arrangement will be on display in our home all fall (and winter) long!

DIY Painted Twig Vase tutorial. Celebrate fall by bringing a little nature indoors! | www.allthingsgd.com  #fall #fallcrafts #falldecor #repurpose #diy

Like this post? Check out my All Things G&D DIY Gallery!

Share this:

  • Pinterest
  • Facebook
  • Twitter
  • Google
  • Email
  • More
  • Tumblr
  • LinkedIn
  • Print
  • Reddit


Comments

  1. 1
    Leslie @ House on the Way says:
    September 9, 2014 at 5:57 am

    I love it! Such a simple idea, but so clever! I’m pinning and sharing on my FB page today.
    Have a great week!

    Reply
    • 2
      Dusty Rogers says:
      October 9, 2014 at 8:36 am

      Thank you so much, Leslie! I appreciate the share!

      Reply
  2. 3
    marcia says:
    September 9, 2014 at 8:15 am

    I love this Dusty! I’ve been looking for a specific size vase and this will be perfect! I’ll probably use a two-tone grey and white lacquer for a mod look. :-)

    Reply
    • 4
      Dusty Rogers says:
      October 9, 2014 at 8:36 am

      That would look gorgeous, Marcia – definitely your style!

      Reply
  3. 5
    Vintage4YourHome says:
    September 9, 2014 at 11:10 pm

    You and I have the same thoughts.. I had a tree cut down over the weekend and had bunch of twigs all over the ground. Working on it this week ahead. Your’s look fatastic

    Reply
    • 6
      Dusty Rogers says:
      October 9, 2014 at 8:37 am

      So fun! I hope yours turns out great! I love being able to bring a little outdoors inside, AND being able to keep a piece of the tree in our front yard even after we move!

      Reply
  4. 7
    Jeanie says:
    September 11, 2014 at 5:58 pm

    This is so pretty Dusty! You gave me a perfect solution to a vase issue I was having just this morning! Thanks for sharing. Pinning!

    Reply
    • 8
      Dusty Rogers says:
      October 9, 2014 at 8:38 am

      I love hearing that, thank you Jeanie! I hope your vase issue is all resolved and looking fabulous!

      Reply
  5. 9
    Deborah says:
    September 15, 2014 at 7:10 pm

    NOW THAT’S AWESOME!! Love makin use with what you got…nailed it!!

    Reply
    • 10
      Dusty Rogers says:
      October 9, 2014 at 8:38 am

      Thank you so much, Deborah!

      Reply
  6. 11
    Donna says:
    September 17, 2014 at 7:16 am

    Love it! And I love autumn! Can’t wait to try this.

    Reply
    • 12
      Dusty Rogers says:
      October 9, 2014 at 8:39 am

      Thank you, Donna! I hope you do give it a try! It was time consuming, but not difficult.

      Reply
  7. 13
    Debbie says:
    September 17, 2014 at 10:24 am

    Super cute! Thanks for sharing the tutorial.

    Reply
    • 14
      Dusty Rogers says:
      October 9, 2014 at 7:49 am

      Thank you so much, Debbie!

      Reply

Leave a Reply to Deborah Cancel reply

Your email address will not be published. Required fields are marked *


Details Boutique - women's fashion boutique. Statement style for grown-ass women. www.detailsgetnoticed.com

Looking for something?

  • 
  • 
  • 
  • 
  • 
  • 
  • 
  • 
  • 

Subscribe

Categories

Archives

Most Popular Posts

  • 10 Tips for Perfect Cake Pops
  • FREE Cars Birthday Party Printables
  • FREE Sesame Street Birthday Party Printables
  • The Making of Kate's Cars Birthday Party
  • Lowe's Maine Makeover | Day 1
  • How to Add a Shelf to an IKEA Expedit
  • How to Make DIY Roman Shades for Wide Windows Using Mini Blinds
  • Kate's Sesame Street Birthday Party!

Hi! I’m Dusty Rogers - blogger,
mother, maker, decorator, and drinker
of the wine here at All Things G&D.
Thank you so much for joining me!

  • facebook
  • instagram
  • pinterest
  • twitter

Join The VIP List

Copyright © 2023 All Things G&D Log in

loading Cancel
Post was not sent - check your email addresses!
Email check failed, please try again
Sorry, your blog cannot share posts by email.